
In an era dominated by high-tech fitness gadgets and state-of-the-art gym equipment, the simplicity and effectiveness of calisthenics remain unparalleled. Derived from the Greek words “kalos,” meaning beauty, and “sthenos,” meaning strength, calisthenics is the art of using one’s own body weight to build strength, flexibility, and endurance. Explore a wide range of calisthenics exercises by muscle group to enhance your fitness routine with targeted workouts.
In this comprehensive guide, we will delve into the world of calisthenics, exploring the best exercises categorized by muscle group. Whether you’re a seasoned athlete or a beginner looking to embark on a fitness journey, this guide will provide a roadmap to sculpting a powerful, functional physique without the need for complex machinery.
Table of Contents:
- Pectorals, Deltoids, and Triceps
- Core Stability and Power: Abdominals and Obliques
- Lower Body Dominance: Quadriceps, Hamstrings, and Glutes
- Overview
- References
Pectorals, Deltoids, and Triceps
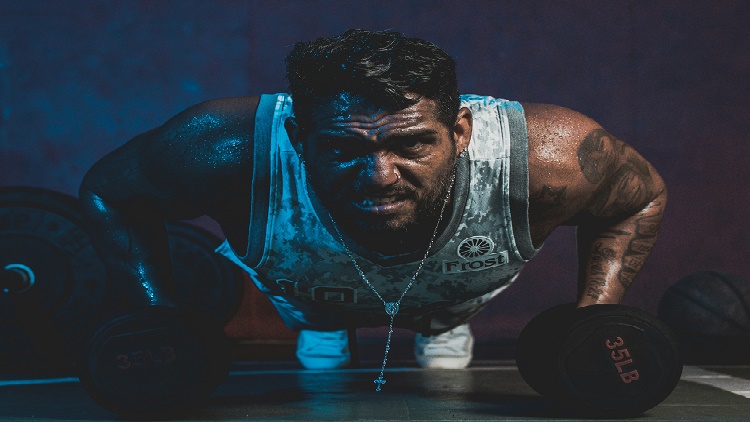
1. Push-Ups: The Quintessential Upper Body Exercise
When it comes to calisthenics, few exercises rival the effectiveness and versatility of the humble push-up. This timeless classic has been a cornerstone of fitness routines for good reason; it engages multiple muscle groups, promotes functional strength, and requires nothing more than your own body weight. In this section, we will explore the mechanics of the push-up and its variations, ensuring that you get the most out of this fundamental exercise.
Mechanics of a Push-Up
The push-up primarily targets the pectoral muscles, deltoids, and triceps, while also engaging the core for stability. Proper form is crucial to maximize the benefits and prevent injury.
- Starting Position: Begin in a plank position with your hands slightly wider than shoulder-width apart, fingers pointing forward. Your body should form a straight line from head to heels.
- Descent: Lower your body by bending your elbows, keeping them close to your sides. Aim to bring your chest as close to the ground as possible without touching it.
- Ascent: Push through your palms to extend your arms, returning to the starting position.
Variations of Push-Ups
- Diamond Push-Ups: This variation targets the triceps more intensely. Place your hands close together in a diamond shape beneath your chest.
- Wide Grip Push-Ups: Widening your hand placement shifts emphasis to the chest muscles.
- Decline Push-Ups: Elevate your feet on an elevated surface (like a bench) to increase the difficulty and engage the upper chest.
Common Mistakes to Avoid
- Sagging Hips: Maintain a straight line from head to heels. Avoid letting your hips drop or pike upwards.
- Flaring Elbows: Keep your elbows tucked close to your sides rather than letting them splay outwards.
- Incomplete Range of Motion: Aim for a full range of motion, ensuring your chest comes close to the ground.
Progression and Scaling
For beginners, performing push-ups from an elevated surface (like a bench) can help build strength. As you progress, gradually lower the height of the surface until you can perform push-ups on the ground.
Mastering the push-up is not only a testament to upper body strength but also a foundation for a wide range of calisthenic movements. By incorporating variations and focusing on proper form, you can unlock the full potential of this quintessential exercise.
2. Dips: Sculpting Triceps and Chest
Dips are a powerhouse exercise that target the triceps, chest, and shoulders. This compound movement, often performed on parallel bars, is an excellent addition to any calisthenics routine, offering a potent way to build upper body strength and definition.
Mechanics of Dips
Dips are a vertical pushing exercise that require a stable base and controlled movement.
- Starting Position: Stand between two parallel bars and grip them firmly with your hands shoulder-width apart. Lift yourself off the ground, supporting your weight with straight arms.
- Descent: Lower your body by bending your elbows, allowing them to flare out slightly. Lower yourself until your shoulders are roughly level with your elbows or you feel a deep stretch in your chest and shoulders.
- Ascent: Push through your palms to extend your arms, returning to the starting position.
Targeted Muscles
- Triceps Brachii: The primary mover in dips, the triceps are responsible for extending the elbow joint.
- Pectoralis Major: This chest muscle is heavily engaged during the dip, particularly when leaning forward slightly.
- Anterior Deltoids: The front portion of the shoulder muscles is activated during both the descent and ascent.
Variations of Dips
- Parallel Bar Dips: The standard version of the exercise, performed on parallel bars.
- Bench Dips: This variation utilizes a bench or elevated surface to simplify the movement, making it suitable for beginners.
- Ring Dips: Using gymnastic rings introduces instability, demanding greater stabilization from the core and shoulders.
Common Mistakes to Avoid
- Incomplete Range of Motion: Ensure you go through the full range of motion, descending until your shoulders are level with your elbows.
- Leaning Too Far Forward: While a slight forward lean engages the chest, excessive leaning can strain the shoulders.
- Locked Elbows: Avoid locking your elbows at the top of the movement to prevent unnecessary stress on the joints.
Progression and Scaling
For those new to dips, using assistance from resistance bands or a partner can be helpful. As strength increases, you can gradually reduce assistance until you can perform unassisted dips.
Dips are a dynamic exercise that not only sculpts the triceps and chest but also enhances shoulder strength and stability. By incorporating dips into your calisthenics routine, you’ll not only build impressive upper body strength but also develop functional pushing power.
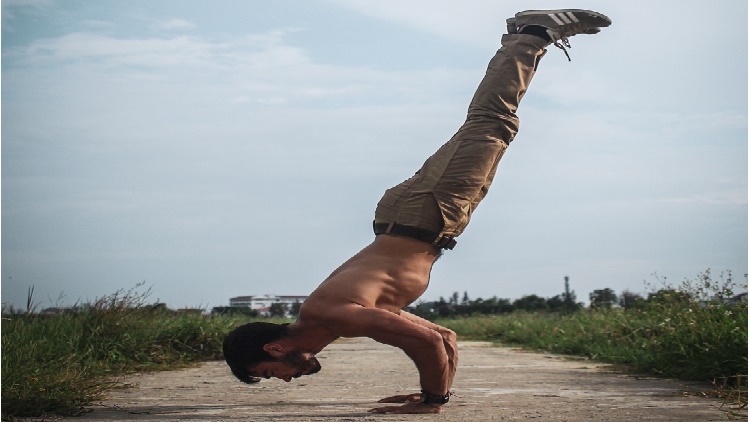
3. Handstand Push-Ups: Defying Gravity for Shoulder Strength
Handstand push-ups represent a pinnacle of upper body strength and control in the world of calisthenics. This advanced exercise not only targets the shoulders but also engages the triceps, upper back, and core. Mastering handstand push-ups requires a combination of strength, balance, and technique, making it a true test of athleticism.
Mechanics of Handstand Push-Ups
Handstand push-ups represent a pinnacle of upper body strength and control in the world of calisthenics. This advanced exercise not only targets the shoulders but also engages the triceps, upper back, and core. Mastering handstand push-ups requires a combination of strength, balance, and technique, making it a true test of athleticism.
Starting Position
- Hand Placement: Begin by positioning your hands on the ground, slightly wider than shoulder-width apart. Your fingers should be spread wide for stability.
- Kick-Up: Kick your legs up, aiming to achieve a vertical handstand position. This requires a controlled kick to ensure you land with your feet against a wall or in a balanced free-standing handstand.
- Stacked Alignment: Once in position, your body should form a straight line from wrists to heels. Engage your core and glutes to maintain this alignment.
Descent Phase
- Bend Elbows: Begin the descent by bending your elbows. Lower your head towards the ground, aiming for your hands to end up just outside of shoulder level.
- Controlled Movement: Keep the movement slow and controlled. Avoid letting your head slam into the ground; instead, gently touch your head to the floor.
Ascent Phase
- Push Through Palms: Begin to straighten your arms, pushing through your palms. Engage your shoulders, triceps, and chest to initiate the ascent.
- Return to Handstand: Continue pressing until your arms are fully extended, returning to the starting handstand position.
Key Points to Remember
- Maintain Core Engagement: Keep your core tight throughout the entire movement to stabilize your body.
- Controlled Breathing: Maintain steady breathing to support your exertion and maintain focus.
- Balanced Weight Distribution: Ensure that your weight is evenly distributed through your palms to avoid straining your wrists.
Common Mistakes to Avoid
- Insufficient Warm-Up: Ensure your shoulders and wrists are adequately warmed up before attempting handstand push-ups.
- Excessive Arch in Lower Back: Avoid overarching your lower back; aim to maintain a straight line from wrists to heels.
- Skipping Progressions: If you’re new to handstand push-ups, start with wall-assisted variations and gradually progress to freestanding ones.
Progression and Scaling
For those new to handstand push-ups, using assistance from resistance bands or a partner can be helpful. As strength increases, you can gradually reduce assistance until you can perform unassisted handstand push-ups.
By mastering the mechanics of handstand push-ups, you’ll not only develop formidable shoulder strength but also gain a valuable skill in the world of calisthenics.
Core Stability and Power: Abdominals and Obliques
1. Planks: Building Core Stability
When it comes to developing a strong and stable core, few exercises are as effective and versatile as the plank. This static hold engages a range of core muscles, promoting not only strength but also endurance and postural control. In this section, we will delve into the mechanics of planks, their variations, and the benefits they bring to your overall fitness.
Mechanics of Planks
The plank is deceptively simple yet incredibly effective in building core strength and stability.
- Starting Position: Begin in a prone position, lying face down on the ground. Position your forearms on the ground, elbows directly beneath your shoulders. Extend your legs straight, resting on the balls of your feet.
- Activation: Lift your body off the ground, maintaining a straight line from head to heels. Engage your core muscles to prevent sagging or arching in the back.
- Hold: Maintain this position for the desired duration, ensuring steady breathing and a tight core.
Targeted Muscles
- Rectus Abdominis: The front layer of abdominal muscles, responsible for flexing the spine.
- Transverse Abdominis: A deep-lying muscle that acts like a corset, providing stability to the spine and pelvis.
- Obliques: Both internal and external obliques are engaged to prevent rotation of the torso.
Variations of Planks
- Forearm Plank: The standard plank position described above, with weight supported on forearms.
- Side Plank: Performed by lying on one side and supporting the body with one forearm, engaging the lateral core muscles.
- Plank Variations with Movement: Incorporate dynamic elements like shoulder taps or leg lifts to increase the challenge.
Common Mistakes to Avoid
- Sagging Hips: Maintain a straight line from head to heels, avoiding sagging in the lower back.
- Elevated Shoulders: Relax your shoulders, ensuring they’re not hunched up towards your ears.
- Holding Your Breath: Breathe naturally to maintain steady oxygen flow to your muscles.
Progression and Scaling
For beginners, starting with shorter holds and gradually increasing duration is key. As you progress, you can experiment with different plank variations or add challenges like lifting one arm or leg.
Planks are a cornerstone exercise for building core stability, which is crucial for overall strength and functional movement. By incorporating planks into your routine, you’ll not only develop a stronger core but also enhance your posture and reduce the risk of lower back pain.
2. Leg Raises: Sculpting the Lower Abs
For those seeking to chisel their midsection and develop a well-defined lower abdomen, leg raises are an indispensable exercise. This dynamic movement directly targets the lower rectus abdominis, providing a powerful workout for the lower core. In this section, we will delve into the mechanics of leg raises, their variations, and how they contribute to achieving a sculpted midsection.
Mechanics of Leg Raises
Leg raises are a dynamic exercise that require controlled movement and strong core engagement.
- Starting Position: Lie flat on your back with your arms by your sides and legs extended. Keep your lower back pressed into the floor to engage your core.
- Execution: Lift your legs off the ground, keeping them straight and together. Use your lower abdominal muscles to control the movement.
- Ascent and Descent: Continue raising your legs until they form a 90-degree angle with your torso. Slowly lower them back down to the starting position with controlled movement.
Targeted Muscles
- Lower Rectus Abdominis: Leg raises primarily engage the lower portion of the rectus abdominis, which is responsible for flexing the lower spine.
- Hip Flexors: Muscles like the iliopsoas play a supporting role in lifting the legs.
Variations of Leg Raises
- Hanging Leg Raises: Perform this variation by hanging from a bar, engaging not only the lower abs but also the grip and shoulder muscles.
- Bent Knee Leg Raises: This variation reduces the lever arm, making it slightly easier and focusing more on the lower abs.
- Reverse Leg Raises: Lie face down and lift your legs towards the ceiling, engaging the lower back and glutes along with the lower abs.
Common Mistakes to Avoid
- Using Momentum: Ensure that you’re using controlled movement, rather than swinging your legs.
- Lifting Hips Off the Ground: Keep your lower back pressed into the floor throughout the movement.
- Neglecting Breathing: Maintain a steady breathing pattern to support the engagement of your core muscles.
Progression and Scaling
Beginners can start with bent knee leg raises to reduce the intensity. As strength increases, progress to straight-legged variations. Adding ankle weights or using a decline bench can further increase the challenge.
Leg raises are a targeted exercise for sculpting the lower abs, contributing to a well-defined midsection. By incorporating leg raises into your routine, you’ll not only strengthen your lower abdominal muscles but also enhance overall core stability.
Lower Body Dominance: Quadriceps, Hamstrings, and Glutes
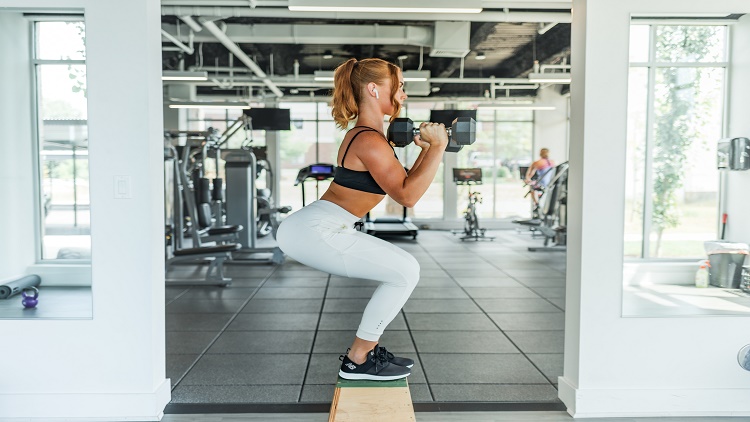
1. Squats: The King of Lower Body Exercises
When it comes to lower body strength and muscle development, few exercises hold a candle to the squat. This compound movement engages multiple muscle groups, including the quadriceps, hamstrings, glutes, and lower back, making it an indispensable component of any comprehensive fitness regimen. In this section, we will explore the mechanics of squats, their variations, and the benefits they bring to your lower body strength and functionality.
Mechanics of Squats
A proper squat involves a controlled descent and ascent, engaging various muscle groups.
- Starting Position: Stand with your feet shoulder-width apart, toes pointing slightly outward. Keep your chest up, shoulders back, and gaze forward.
- Descent: Initiate the squat by pushing your hips back and bending your knees. Lower your body until your thighs are at least parallel to the ground, or as far as your flexibility allows.
- Ascent: Push through your heels to stand back up, extending your hips and knees simultaneously.
Targeted Muscles
- Quadriceps: Located at the front of the thigh, the quadriceps are the primary muscles responsible for extending the knee joint during squats.
- Hamstrings: Located at the back of the thigh, the hamstrings play a crucial role in controlling the descent and providing stability.
- Glutes: The gluteus maximus is heavily engaged during the ascent phase, driving hip extension.
- Lower Back and Core: These muscles stabilize the spine throughout the movement.
Variations of Squats
- Bodyweight Squats: The foundational squat variation, performed without added resistance.
- Goblet Squats: Holding a dumbbell or kettlebell at chest level adds resistance and encourages proper form.
- Barbell Back Squats: This advanced version involves placing a barbell across your upper back, allowing for heavier loads.
Common Mistakes to Avoid
- Knees Caving In: Ensure your knees track in line with your toes, rather than collapsing inward.
- Leaning Too Far Forward: Keep your chest up and back straight, avoiding excessive forward lean.
- Incomplete Range of Motion: Aim to squat until your thighs are at least parallel to the ground, or as far as your flexibility allows.
Progression and Scaling
Beginners can start with bodyweight squats and gradually add resistance as they become more comfortable with the movement. Progress to goblet squats and eventually incorporate barbell back squats for greater challenge.
Squats are unrivaled in their ability to build lower body strength and muscle mass. By incorporating squats into your routine, you’ll not only develop powerful legs and glutes but also improve overall functional strength for activities in daily life.
2. Glute Bridges: Activating the Glutes
For those seeking to strengthen and tone their glutes, few exercises are as effective and accessible as the glute bridge. This simple yet potent movement isolates and activates the gluteal muscles, making it a valuable addition to any lower body routine. In this section, we will delve into the mechanics of glute bridges, their variations, and the benefits they bring to your posterior chain.
Mechanics of Glute Bridges
The glute bridge is a controlled movement that primarily targets the gluteus maximus, the largest muscle in the gluteal group.
- Starting Position: Lie flat on your back with your knees bent and feet flat on the ground, hip-width apart. Keep your arms by your sides.
- Activation: Engage your core and press through your heels to lift your hips off the ground. Your body should form a straight line from shoulders to knees.
- Hold and Descent: Squeeze your glutes at the top of the movement, then lower your hips back down to the starting position with control.
Targeted Muscles
- Gluteus Maximus: This powerful muscle is responsible for hip extension, and it’s the primary mover in glute bridges.
- Hamstrings: The back of the thighs, the hamstrings support hip extension and knee flexion during the movement.
Variations of Glute Bridges
- Single-Leg Glute Bridges: Elevate one foot off the ground, extending it straight out, to increase the intensity and engage each glute independently.
- Elevated Glute Bridges: Place your feet on an elevated surface (like a bench) to increase the range of motion and engage the glutes more intensely.
- Weighted Glute Bridges: Add resistance by placing a weight (such as a dumbbell or barbell) on your hips for added challenge.
Common Mistakes to Avoid
- Allowing Knees to Collapse Inward: Keep your knees in line with your feet to prevent stress on the knees.
- Not Engaging the Core: Maintain core engagement throughout the movement to support stability and protect the lower back.
- Hyperextending the Lower Back: Avoid arching your lower back excessively; aim for a straight line from shoulders to knees.
Progression and Scaling
Beginners can start with bodyweight glute bridges and gradually progress to more advanced variations. Incorporating resistance or increasing the range of motion can further intensify the exercise.
Glute bridges are a powerful tool for targeting and strengthening the gluteal muscles. By incorporating glute bridges into your routine, you’ll not only enhance the aesthetics of your posterior chain but also improve overall lower body strength and stability.
Overview
Calisthenics, with its emphasis on bodyweight exercises, offers a unique and effective approach to building strength and improving overall fitness. By focusing on specific muscle groups and utilizing a variety of exercises, individuals can create a balanced and targeted workout routine. Incorporating these exercises into your regimen will undoubtedly lead to a stronger, more functional physique.
In the words of the legendary calisthenics practitioner, Charles Atlas, “The difference between a successful person and others is not a lack of strength, not a lack of knowledge, but rather a lack of will.” So, arm yourself with knowledge, muster your willpower, and embark on your calisthenics journey towards a healthier, stronger you.
Reference:
- Contreras, B., Vigotsky, A. D., Schoenfeld, B. J., Beardsley, C., & Cronin, J. (2015). A comparison of gluteus maximus, biceps femoris, and vastus lateralis electromyographic activity in the back squat and barbell hip thrust exercises. The Journal of Applied Biomechanics, 31(6), 452-458.
- Schoenfeld, B. J., Contreras, B., Tiryaki-Sonmez, G., Willardson, J. M., & Fontana, F. (2014). An electromyographic comparison of a modified version of the plank with a long lever and posterior tilt versus the traditional plank exercise. Sports Biomechanics, 13(3), 296-306.
- Signorile, J. F., Ingalls, C., & Tremblay, L. M. (1995). The effects of supine rest and exercise training on the exercise pressor reflex in chronic heart failure patients. Medicine and Science in Sports and Exercise, 27(1), 56-62.
- Vera-Garcia, F. J., Grenier, S. G., & McGill, S. M. (2000). Abdominal muscle response during curl-ups on both stable and labile surfaces. Physical Therapy, 80(6), 564-569.
- Youdas, J. W., Guck, B. R., Hebrink, R. C., Rugotzke, J. D., Madson, T. J., & Hollman, J. H. (2008). An electromyographic evaluation of abdominal muscle activation during pelvic tilt and abdominal hollowing exercises: Implications for rehabilitation. Physical Therapy, 88(6), 711-722.
- Escamilla, R. F., Fleisig, G. S., Zheng, N., Barrentine, S. W., Wilk, K. E., & Andrews, J. R. (1998). Biomechanics of the knee during closed kinetic chain and open kinetic chain exercises. Medicine & Science in Sports & Exercise, 30(4), 556-569.
- McCaw, S. T., & Friday, J. J. (1994). A comparison of muscle activity between a free weight and machine bench press. The Journal of Strength & Conditioning Research, 8(4), 259-264.
- Featured image @Unsplash, freepik, pexels (com)
- Featured stream @Youtube, freepik, pexels (com)


