
The supraspinatus muscle is one of the four muscles that make up the rotator cuff, a group of muscles and tendons that surround the shoulder joint and help stabilize and move the shoulder. The Supraspinatus Stretching and Strengthening Workouts are responsible for initiating the movement of the arm away from the body (abduction) and plays a crucial role in overhead activities such as throwing, reaching, and lifting.
Because of its important role in shoulder function, it is essential to keep the supraspinatus muscle strong and flexible. This is especially important for athletes, such as baseball pitchers, swimmers, and tennis players, as well as individuals who engage in activities that require repetitive overhead motions.
In this article, we will discuss the best supraspinatus stretching and strengthening workouts to help you maintain a healthy and functional shoulder. We will also provide tips on how to perform these exercises safely and effectively. Whether you are recovering from a shoulder injury or looking to prevent one, these exercises can help you improve the strength and flexibility of your supraspinatus muscle.
Table of Contents:
1. Stretching Exercises
2. Strengthening Exercises
3. Tips for Safe and Effective Workouts
4. Conclusion
5. References
Stretching Exercises for the Supraspinatus Muscle
The supraspinatus muscle is one of the four muscles that make up the rotator cuff in the shoulder. Stretching the supraspinatus can help improve flexibility, reduce muscle tightness, and prevent injuries. Here are some stretching exercises specifically targeting the supraspinatus muscle:
1. Cross-Body Shoulder Stretch:
Muscles Targeted:
- Primarily the supraspinatus muscle, but also stretches the deltoids and upper back.
Instructions:
- Stand or sit comfortably with a straight spine.
- Begin with your right arm.
- Bring your right arm across your chest horizontally, reaching towards the opposite shoulder.
- Use your left hand to gently guide your right arm closer to your chest. Place the palm of your left hand on the outside of your right elbow.
- Keep your right shoulder down and relaxed. You should feel a gentle stretch across the back of your right shoulder.
- Hold the stretch for 15-30 seconds, breathing deeply and relaxing into the stretch.
- Repeat the stretch on the other side by bringing your left arm across your chest, and using your right hand to guide it.
Tips:
- Avoid shrugging your shoulders; keep them relaxed and down.
- The stretch should be felt in the back of the shoulder, not in the neck. If you feel any pain, ease off the stretch.
- Adjust the intensity by applying more or less pressure with your opposite hand.
- Perform the stretch in a slow and controlled manner.
Modifications:
- If standing is uncomfortable, you can do this stretch while sitting on a chair or even on the floor.
- Experiment with the height of your arm. You can try variations like a slightly higher or lower arm position to target different parts of the shoulder.
Remember, flexibility varies from person to person, so go to a point where you feel a stretch but not pain. If you have any shoulder issues or concerns, it’s advisable to consult with a healthcare professional or a physical therapist before incorporating new stretches or exercises into your routine.
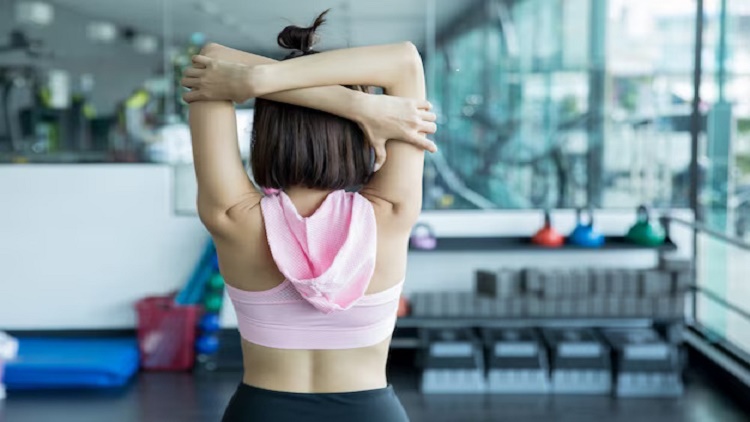
2. Overhead Shoulder Stretch:
Muscles Targeted:
- Primarily the supraspinatus muscle, but also stretches the deltoids and triceps.
Instructions:
- Stand or sit in a comfortable position with a straight spine.
- Start with your right arm.
- Lift your right arm overhead, bending the elbow and reaching your hand down your upper back.
- With your left hand, reach behind your back and try to grasp your right fingertips or hold onto a strap if your hands don’t reach.
- Gently pull your right arm towards the left side, feeling a stretch along the back of your right arm and shoulder.
- Keep your spine straight and your shoulders relaxed. Avoid leaning forward or backward.
- Hold the stretch for 15-30 seconds, breathing deeply and focusing on relaxing into the stretch.
- Repeat the stretch on the other side by lifting your left arm overhead and using your right hand to assist the stretch.
Tips:
- Ensure that your neck remains relaxed, and your chin is slightly tucked.
- If you can’t reach your hands together, use a towel or a yoga strap to bridge the gap between your hands.
- Focus on lengthening through the arm and opening up the shoulder.
Modifications:
- If standing is uncomfortable, you can perform this stretch while sitting on a chair.
- Adjust the intensity by gently pulling the arm closer or releasing a bit of tension.
Remember to perform this stretch with control and within your comfort range. If you experience any pain, ease off the stretch. As always, consult with a healthcare professional or a physical therapist if you have any shoulder issues or concerns before trying new stretches or exercises.
3. Doorway Stretch:
Muscles Targeted:
- Primarily the chest muscles (pectoralis major) and anterior shoulder muscles, but it also helps stretch the supraspinatus and other muscles in the shoulder.
Instructions:
- Stand in a doorway, facing forward.
- Raise your right arm to shoulder height and place your forearm against the door frame with your elbow bent at a 90-degree angle.
- Your upper arm should be parallel to the ground.
- Step forward with your right foot, allowing your chest to gently move forward through the doorway.
- You should feel a stretch across the front of your right shoulder and chest.
- Adjust your position within the doorway to find the level of stretch that is comfortable for you.
- Hold the stretch for 15-30 seconds, breathing deeply and allowing your muscles to relax into the stretch.
- Repeat the stretch on the other side by raising your left arm and stepping forward with your left foot.
Tips:
- Keep your spine straight and avoid arching your lower back.
- Engage your core muscles to stabilize your body during the stretch.
- Relax your shoulders and breathe deeply throughout the stretch.
Modifications:
- You can experiment with different arm positions and angles within the doorway to target slightly different areas of the shoulder and chest.
- If you don’t feel a stretch, or if the stretch is too intense, adjust the angle of your arm or step further or closer to the doorway.
Remember to perform this stretch gently and within your comfort range. If you have any shoulder issues or concerns, it’s advisable to consult with a healthcare professional or a physical therapist before trying new stretches or exercises.
4. Sleeper Stretch:
Muscles Targeted:
- Primarily targets the external rotators of the shoulder, including the supraspinatus and infraspinatus muscles.
Instructions:
- Lie on your left side on a flat, firm surface such as a mat or the floor.
- Extend your left arm straight out in front of you.
- Bend your left elbow at a 90-degree angle, so your left forearm is pointing straight up.
- Use your right hand to gently push your left forearm down towards the floor.
- You should feel a stretch on the back of your left shoulder and upper arm.
- Adjust the angle of your arm to find the position that provides a comfortable stretch.
- Hold the stretch for 15-30 seconds, breathing deeply and allowing your muscles to relax into the stretch.
- Repeat the stretch on the other side by lying on your right side and stretching your right arm.
Tips:
- Ensure your spine is aligned, and your head is supported on a comfortable surface.
- Relax your neck and shoulders during the stretch.
- Avoid applying excessive force; the stretch should be gentle and controlled.
Modifications:
- If you find it difficult to lie on your side, you can perform a modified version of this stretch in a seated position. Sit on a chair and cross your left ankle over your right knee. Then, gently press down on your left knee with your right hand.
Remember to perform this stretch with control and within your comfort range. If you have any shoulder issues or concerns, it’s advisable to consult with a healthcare professional or a physical therapist before trying new stretches or exercises.
5. Child’s Pose with Arm Reach:
Muscles Targeted:
- Primarily targets the lats, triceps, and the posterior shoulder muscles, including the supraspinatus.
Instructions:
- Start on your hands and knees in a tabletop position, with your wrists directly under your shoulders and your knees under your hips.
- Inhale and then exhale as you sit back on your heels, extending your arms forward on the floor.
- Keep your arms shoulder-width apart and your palms pressing into the ground.
- Lower your chest towards the floor, allowing your forehead to rest on the mat.
- Extend your arms forward, reaching as far as you comfortably can while keeping your hips back towards your heels.
- You should feel a stretch in your lats, triceps, and the back of your shoulders.
- Hold the stretch for 15-30 seconds, breathing deeply and allowing your muscles to relax.
- To add a reach for the supraspinatus, walk your hands to the right, feeling a stretch along the left side of your upper body. Hold for 15-30 seconds. Repeat on the left side.
Tips:
- Keep your hips back towards your heels to deepen the stretch in your shoulders and upper back.
- If you feel discomfort in your knees, you can place a cushion or blanket under them.
- Allow your chest to sink towards the floor for a more intense stretch.
Modifications:
- If you have difficulty reaching forward, you can keep your arms by your sides in the Child’s Pose position without the forward reach.
- Experiment with different hand positions to find what is most comfortable for you.
Remember to perform this stretch gently and within your comfort range. If you have any knee or shoulder issues or concerns, it’s advisable to consult with a healthcare professional or a physical therapist before trying new stretches or exercises.
Strengthening Exercises for the Supraspinatus Muscle
Strengthening the supraspinatus muscle is crucial for shoulder stability and preventing injuries. Here are some effective exercises to target the supraspinatus:
1. External Rotation with Resistance Band:
Muscles Targeted:
- Primarily targets the external rotators of the shoulder, including the infraspinatus and teres minor, which contribute to the strength and stability of the supraspinatus.
Equipment Needed:
- Resistance band (choose a band with appropriate resistance for your fitness level).
Instructions:
- Attach the resistance band to a fixed point at waist height.
- Stand with your right side facing the anchor point and grab the resistance band with your right hand.
- Position your right elbow against your side, bent at a 90-degree angle, and your forearm parallel to the ground.
- Step away from the anchor point to create tension in the band.
- Keeping your elbow close to your side, externally rotate your forearm away from your body.
- Move your forearm as far as comfortably possible while maintaining control.
- Slowly return to the starting position with control.
- Perform 2-3 sets of 10-15 repetitions on each side.
- Repeat the exercise on the other side by facing the anchor point with your left side.
Tips:
- Keep your core engaged to maintain stability.
- Control the movement throughout, especially during the return to the starting position.
- Ensure smooth, controlled rotation without jerky movements.
Modifications:
- If the resistance is too strong, use a lighter band.
- You can perform this exercise in a seated position if standing is uncomfortable.
Remember to perform this exercise with proper form and within your comfort level. If you have any shoulder issues or concerns, it’s advisable to consult with a healthcare professional or a physical therapist before incorporating new exercises into your routine.
2. Side-Lying External Rotation:
Muscles Targeted:
- This exercise primarily targets the external rotators of the shoulder, particularly the infraspinatus and teres minor. It contributes to the strength and stability of the supraspinatus.
Equipment Needed:
- A light dumbbell (1-5 pounds).
Instructions:
- Lie on your left side on a flat, firm surface, such as a mat.
- Extend your left arm straight out in front of you on the floor.
- Bend your left elbow at a 90-degree angle so that your forearm is pointing straight up.
- Hold a light dumbbell (1-5 pounds) in your right hand, and rest your right elbow on your left side.
- Keep your right forearm parallel to the ground.
- Externally rotate your right arm, lifting the dumbbell toward the ceiling.
- Lift until your forearm is pointing vertically, and you feel a contraction in your external rotator muscles.
- Lower the dumbbell back down slowly and with control.
- Perform 2-3 sets of 10-15 repetitions on each side.
- Repeat the exercise on the other side by lying on your right side and using your left arm.
Tips:
- Keep your core engaged to maintain stability.
- Ensure that your shoulder blades are stabilized and not rolling forward during the movement.
- Control the motion throughout the exercise, avoiding any jerky movements.
Modifications:
- If the weight is too heavy, start with a lighter dumbbell or no weight at all.
- You can perform this exercise with your elbow resting on a rolled-up towel or a small cushion for added comfort.
Remember to perform this exercise with proper form, and if you have any shoulder issues or concerns, it’s advisable to consult with a healthcare professional or a physical therapist before incorporating new exercises into your routine.
3. Full Can Exercise:
Muscles Targeted:
- Primarily targets the supraspinatus muscle and works on shoulder abduction, which is the movement of lifting the arms away from the body.
Equipment Needed:
- A light dumbbell (1-5 pounds).
Instructions:
- Stand with your feet shoulder-width apart.
- Hold a light dumbbell in each hand, with your palms facing down.
- Keep your arms by your sides, and your elbows slightly bent.
- Lift both arms forward and upward at a 45-degree angle, as if you were holding a full can of soda.
- Continue lifting your arms until they are parallel to the ground.
- Hold the position for a moment, feeling the contraction in your shoulders.
- Lower the dumbbells back down slowly to the starting position.
- Perform 2-3 sets of 12-15 repetitions.
Tips:
- Maintain a slight bend in your elbows throughout the movement.
- Keep your core engaged to stabilize your body.
- Control the motion both on the way up and on the way down.
Modifications:
- If you find it challenging, start with a lighter dumbbell or no weight at all.
- Ensure that you’re not arching your lower back during the exercise; maintain good posture.
Remember to perform this exercise with proper form, and if you have any shoulder issues or concerns, it’s advisable to consult with a healthcare professional or a physical therapist before incorporating new exercises into your routine.
4. Prone Y Exercise:
Muscles Targeted:
- This exercise primarily targets the muscles of the upper back, including the lower trapezius and rhomboids. It also engages the supraspinatus and deltoids.
Equipment Needed:
- A light dumbbell (1-5 pounds).
Instructions:
- Lie face down on an incline bench with your chest and stomach against the incline.
- Hold a light dumbbell in each hand, with your palms facing each other.
- Extend your arms straight down towards the floor, allowing them to hang naturally.
- Lift both arms forward and upward, forming a Y shape with your body.
- Squeeze your shoulder blades together at the top of the movement.
- Hold the Y position for a moment, feeling the contraction in your upper back.
- Lower the dumbbells back down slowly to the starting position.
- Perform 2-3 sets of 12-15 repetitions.
Tips:
- Keep your neck in a neutral position; don’t let it droop or hyperextend.
- Maintain a slight bend in your elbows throughout the movement.
- Focus on squeezing your shoulder blades together at the top of the lift.
Modifications:
- If you find it challenging, start with a lighter dumbbell or no weight at all.
- Ensure that your chest is firmly against the incline bench for proper support.
Remember to perform this exercise with proper form, and if you have any concerns or existing shoulder issues, it’s advisable to consult with a healthcare professional or a physical therapist before incorporating new exercises into your routine.
5. Scapular Squeezes:
The Scapular Squeezes exercise is a simple yet effective way to target the muscles between your shoulder blades, including the rhomboids. Here’s a step-by-step guide:
Muscles Targeted:
- Primarily targets the rhomboids and middle trapezius.
Instructions:
- Sit or stand with your spine straight and your shoulders relaxed.
- Place your hands by your sides, and let your arms hang naturally.
- Squeeze your shoulder blades together by retracting them.
- Imagine trying to pinch something between your shoulder blades.
- Hold the squeeze for a moment to feel the contraction in your upper back.
- Release the squeeze and allow your shoulder blades to move apart.
- Repeat the movement, focusing on controlled and deliberate squeezes.
- Perform 2-3 sets of 15-20 repetitions.
Tips:
- Keep your neck in a neutral position; avoid tilting your head forward or backward.
- Engage your core muscles to maintain good posture.
- Focus on the quality of the movement rather than speed.
Modifications:
- If sitting, you can perform this exercise with or without back support.
- You can also perform scapular squeezes while lying on your stomach on a mat or bench.
This exercise is excellent for improving scapular mobility and strengthening the muscles responsible for maintaining good posture. If you have any concerns or existing shoulder issues, it’s advisable to consult with a healthcare professional or a physical therapist before incorporating new exercises into your routine.
6. Wall Angels:
Wall Angels are a great exercise for improving shoulder mobility and strengthening the muscles of the upper back. Here’s a step-by-step guide:
Muscles Targeted:
- Targets the muscles of the upper back, including the lower trapezius, rhomboids, and posterior deltoids.
Instructions:
- Stand with your back against a wall and your feet a few inches away from the wall.
- Bring your arms up to shoulder height, elbows bent at a 90-degree angle, and the backs of your hands against the wall.
- Your head, upper back, and lower back should all be in contact with the wall.
- Start by sliding your arms upward along the wall, straightening your elbows without allowing your hands to lose contact.
- Reach as high as you comfortably can without lifting your lower back or losing contact with the wall.
- Slowly slide your arms back down to the starting position.
- Repeat the movement, creating a “snow angel” motion on the wall.
- Perform 2-3 sets of 12-15 repetitions.
Tips:
- Maintain contact between your head, upper back, and lower back with the wall throughout the movement.
- Keep your core engaged to stabilize your spine.
- Focus on controlled and smooth movements.
Modifications:
- If you have difficulty keeping your lower back against the wall, you can perform this exercise while sitting on the floor with your back against a wall.
Remember to perform this exercise with proper form, and if you have any concerns or existing shoulder issues, it’s advisable to consult with a healthcare professional or a physical therapist before incorporating new exercises into your routine.
Safety Tips for Supraspinatus Exercises
Safety is paramount when performing exercises, especially for the supraspinatus muscle, which is part of the rotator cuff and can be susceptible to injury. Here are some safety tips to consider when engaging in supraspinatus exercises:
1. Warm-Up for Supraspinatus Stretching and Strengthening Workouts:
– Always start with a proper warm-up to increase blood flow to the muscles and prepare them for activity. Gentle shoulder circles, arm swings, and light aerobic exercise can be beneficial.
2. Proper Form for Supraspinatus Stretching and Strengthening Workouts:
– Maintain proper form during all exercises. Incorrect form can lead to overuse injuries and unnecessary strain on the supraspinatus and surrounding structures.
3. Start with Low Resistance:
– If you’re new to supraspinatus exercises, begin with light resistance or bodyweight to allow your muscles to adapt gradually. You can increase the resistance as your strength improves.
4. Progress Gradually for Supraspinatus Stretching and Strengthening Workouts:
– Progress the intensity of your exercises gradually. Avoid sudden increases in weight or resistance to reduce the risk of overloading the muscles and causing injury.
5. Avoid Overtraining for Supraspinatus Stretching and Strengthening Workouts:
– Allow adequate rest between sessions targeting the supraspinatus. Overtraining can lead to fatigue and increase the risk of injury.
6. Listen to Your Body:
– Pay attention to any discomfort or pain during exercises. If you experience sharp or persistent pain, stop the exercise and consult with a healthcare professional.
7. Balanced Training:
– Include a balanced shoulder workout that targets all aspects of shoulder strength and stability. This includes exercises for the front, side, and rear deltoids, as well as the rotator cuff muscles.
8. Use Appropriate Equipment for Supraspinatus Stretching and Strengthening Workouts:
– When using resistance bands or weights, ensure that the equipment is in good condition and appropriate for your fitness level. Inspect resistance bands for any signs of wear or damage.
9. Range of Motion:
– Focus on controlled movements and a full range of motion during exercises. Avoid sudden or jerky movements that can strain the shoulder.
10. Consult a Professional for Supraspinatus Stretching and Strengthening Workouts:
– If you have a history of shoulder injuries or pain, or if you’re unsure about the appropriateness of specific exercises, consult with a physical therapist or healthcare professional for guidance.
11. Ice and Rest:
– If you experience any soreness or mild discomfort after exercising, consider applying ice to the affected area and allow adequate time for rest and recovery before engaging in similar activities again.
Always prioritize safety and seek professional guidance when Supraspinatus Stretching and Strengthening Workouts if you have any concerns or pre-existing conditions. Remember that individual responses to exercise can vary, so tailor your routine to your specific needs and abilities.
Overview
Maintaining the strength and flexibility of the supraspinatus muscle is crucial for shoulder health and function. By incorporating Supraspinatus Stretching and Strengthening Workouts into your fitness routine, you can improve the stability and mobility of your shoulders, reduce the risk of injury, and enhance your overall athletic performance.
Remember to prioritize safety and proper form when performing Supraspinatus Stretching and Strengthening Workouts, and listen to your body to avoid overexertion or injury. With consistent practice and dedication, you can improve the health and function of your shoulders and enjoy a more active and pain-free lifestyle.
References:
1. “Rotator Cuff and Shoulder Conditioning Program.” American Academy of Orthopaedic Surgeons. https://orthoinfo.aaos.org/en/recovery/rotator-cuff-and-shoulder-conditioning-program/
2. “Rotator Cuff Injury.” Mayo Clinic. https://www.mayoclinic.org/diseases-conditions/rotator-cuff-injury/symptoms-causes/syc-20350225
3. “Shoulder Exercises.” Physiopedia. https://www.physio-pedia.com/Shoulder_Exercises
4. “Shoulder Stretching Exercises.” OrthoInfo. https://orthoinfo.aaos.org/en/staying-healthy/shoulder-stretching-exercises
5. “Shoulder Strengthening Exercises.” OrthoInfo. https://orthoinfo.aaos.org/en/staying-healthy/shoulder-strengthening-exercises
6. Featured image @Unsplash, freepik, pexels (com)
7. Featured stream @Youtube, freepik, pexels (com)


