

In the realm of strength training, where raw power meets functional athleticism, Strongman workouts stand as a testament to human capability. With a nod to the unconventional, these workouts demand a unique blend of strength, endurance, and mental fortitude. In this comprehensive guide, we delve into the specifics of Strongman – Cycle 3 Week 3, Days 1, 2, and 3, exploring the nuances that make this phase a true crucible for those seeking to push their limits.
Table of Contents:
- Day 1: The Foundation of Power
- Day 2: Embracing the Odd and Unconventional
- Day 3: Tactical Precision in Strongman Training
- Nutritional Considerations
- Recovery Protocols
- Overview
Day 1: The Foundation of Power – Practical Guide (Strongman – Cycle 3 Week 3)
Embarking on Day 1 of Strongman Cycle 3, Week 3, you’re entering the realm of foundational power, where deadlifts, farmers’ walks, and tire flips converge to forge a robust strength base. Let’s break down the practical aspects of executing each exercise with precision and efficiency.
1.1 Deadlifts: The Bedrock of Strength – Practical Execution and Tips
Deadlifts, the foundational exercise in strength training, serve as the bedrock for building overall power, muscle mass, and functional strength. Executing deadlifts with precision is crucial to maximizing their benefits while minimizing the risk of injury. Here’s a practical guide on how to perform deadlifts effectively, along with tips to optimize your strength-building experience:
Proper Execution:
1. Setting Up the Barbell:
- Load an appropriate weight onto a barbell, considering your current strength level.
- Ensure the barbell is positioned over the mid-foot with the plates secured.
2. Foot Placement:
- Stand with your feet hip-width apart, toes pointing forward or slightly outward.
- Position the barbell close to your shins.
3. Gripping the Barbell:
- Bend at the hips and knees, reaching down to grip the barbell with hands just outside shoulder-width.
- Choose between a double overhand grip or a mixed grip (one hand overhand, one underhand).
4. Setting Your Grip:
- Ensure your grip is firm, and your wrists are in a neutral position.
- Engage your lats by squeezing your shoulder blades together.

5. Hip Positioning:
- Set your hips lower than your shoulders, maintaining a flat back.
- Keep your chest up, and gaze straight ahead.
6. Lifting the Barbell:
- Drive through your heels, straightening your hips and knees simultaneously.
- Maintain a strong core and extend your hips fully to stand upright.
7. Lowering the Barbell:
- To lower the barbell, hinge at the hips and bend your knees, keeping the bar close to your body.
- Lower the bar with control to the starting position.
Tips for Optimal Performance:
1. Maintain Proper Form:
- Keep a neutral spine throughout the lift, avoiding rounding or arching of the back.
- Ensure the barbell follows a vertical path close to your body.
2. Foot and Hand Placement:
- Experiment with foot and hand placement to find a stance and grip width that feels comfortable and natural.
- Adjustments may be necessary based on individual anatomy and preferences.
3. Breathing Technique:
- Inhale deeply before initiating the lift to brace your core.
- Hold your breath during the lift, and exhale at the top of the movement or during the descent.
4. Engage Your Hamstrings:
- Focus on engaging your hamstrings to assist in the hip hinge movement.
- Think about pushing your hips back while maintaining a straight back.
5. Gradual Progression:
- Start with a weight that allows for proper form and technique.
- Gradually increase the weight as your strength improves, avoiding abrupt jumps.
6. Warm-Up Adequately:
- Dedicate time to warm up your muscles and joints before attempting heavy deadlifts.
- Include dynamic stretches, light cardio, and warm-up sets with lighter weights.
7. Recovery Between Sets:
- Allow sufficient rest between deadlift sets to ensure optimal strength and form.
- Adjust rest intervals based on your individual recovery needs.
8. Safety Considerations:
- Be cautious with heavier weights, and use a lifting belt if needed.
- If you experience any pain or discomfort, reassess your form and consult with a fitness professional.
9. Visualization:
- Visualize successful lifts before starting, fostering a positive and confident mindset.
- Concentrate on the muscles involved and the smooth execution of the movement.
Incorporating deadlifts into your strength training regimen establishes a solid foundation for overall physical development. Focus on perfecting your form, progressively increasing weights, and embracing the challenge of lifting heavier over time. As with any strength training exercise, if you’re new to deadlifts or have any underlying health concerns, consult with a fitness professional or healthcare provider before incorporating them into your training program.
1.2 Farmers’ Walks: Fortifying Grip and Endurance – Practical Execution and Tips
Farmers’ walks stand as a testament to Strongman training’s practicality, emphasizing grip strength, endurance, and overall functional fitness. This exercise not only builds robust physical attributes but also simulates real-world tasks, making it a cornerstone of Strongman routines. Here’s a practical guide on how to execute Farmers’ walks effectively, along with tips to maximize grip strength and endurance:

Proper Execution:
1. Selecting Implements:
- Choose appropriate implements (dumbbells, kettlebells, or farmer’s walk handles) with weights suitable for your current strength level.
- Ensure the implements are gripped securely to prevent slippage.
2. Gripping the Implements:
- Stand between the implements with your feet shoulder-width apart.
- Bend at the hips and knees, maintaining a straight back.
- Grip the handles firmly, keeping your wrists neutral.
3. Lifting Technique:
- Engage your core and lift the implements off the ground by extending your hips and knees.
- Stand up straight with the implements hanging by your sides.
4. Walking Movement:
- Take short, controlled steps, maintaining an upright posture.
- Keep the implements close to your body to minimize swaying.
5. Turning with the Implements:
- For turns, pivot on one foot while keeping the implements close.
- Maintain control during turns to avoid imbalance.
6. Lowering the Implements:
- Approach the designated spot for lowering the implements.
- Bend at the hips and knees, lowering the implements to the ground under control.
Tips for Optimal Performance:
1. Stance and Posture:
- Maintain a stable and balanced stance throughout the walk.
- Keep your shoulders back, chest up, and back straight to minimize stress on the lower back.
2. Foot Placement:
- Position your feet directly beneath your hips for optimal balance.
- Lift your feet slightly to allow the implements to clear the ground.
3. Core Engagement:
- Tighten your core throughout the walk to provide stability.
- A strong core contributes to better overall posture and endurance.
4. Breathing Technique:
- Inhale deeply before initiating the walk to brace your core.
- Maintain a rhythmic breathing pattern throughout the walk.
5. Grip Strength Training:
- Incorporate specific grip strength exercises into your routine, such as farmer’s walks with heavier weights or grip-intensive movements like deadlifts and rows.
6. Progressive Overload:
- Begin with a manageable weight and progressively increase it as your grip strength improves.
- Focus on gradual progression rather than attempting maximal loads initially.
7. Repetition and Set Considerations:
- Structure your Farmers’ walks with a moderate number of repetitions and multiple sets.
- Experiment with different distances and time intervals for added variety.
8. Safety Precautions:
- Ensure the training area is clear of obstacles to avoid tripping.
- If the implements become too heavy or unwieldy, consider using a partner or reducing the weight.
9. Visualization:
- Visualize a strong, controlled walk before starting.
- Cultivate a positive and determined mindset during each walk.
Incorporating Farmers’ walks into your Strongman routine fortifies your grip strength and enhances overall endurance. Focus on maintaining proper form, gradually increasing weights, and challenging yourself with varied distances. As with any Strongman exercise, if you’re new to Farmers’ walks or have any underlying health concerns, consult with a fitness professional or healthcare provider before incorporating them into your training program.
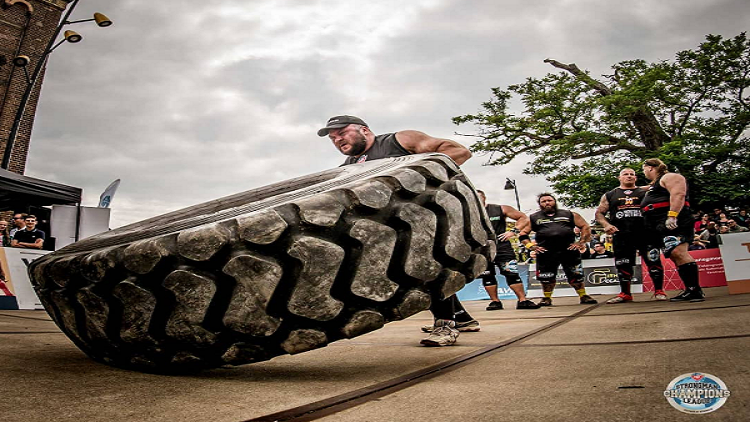
1.3 Tire Flips: Mastering Raw Power – Practical Execution and Tips
Tire flips are a quintessential Strongman exercise that demands an explosion of raw power and a primal display of strength. Mastering this exercise not only builds muscle but also taps into the fundamental essence of physical prowess. Here’s a practical guide on how to execute tire flips effectively, along with tips to maximize your display of raw power:
Proper Execution:
1. Choosing the Tire:
- Select a tire with an appropriate weight for your current strength level.
- Ensure the tire is on a flat, stable surface to prevent tilting.
2. Approach and Gripping:
- Stand in front of the tire with your feet shoulder-width apart.
- Bend at the hips and knees, gripping the underside of the tire with both hands.
3. Lifting Technique:
- Explosively extend your hips and knees to lift the tire off the ground.
- Maintain an upright posture with your back straight and chest up.
4. Driving the Tire:
- Once the tire is lifted, drive it forward by pushing it with your hands.
- Use your legs to propel the tire forward in a controlled manner.
5. Flipping the Tire:
- As the tire reaches its apex, transition from a push to a pull motion.
- Redirect your hands to the top of the tire, pulling it towards you.
6. Controlled Descent:
- Allow the tire to descend in a controlled manner, resisting the urge to let it drop.
- Keep a firm grip on the tire throughout the movement.
Tips for Optimal Performance:
1. Stance and Balance:
- Maintain a stable and balanced stance during the lift and flip.
- Keep your weight centered, and avoid leaning too far forward or backward.
2. Foot Placement:
- Position your feet for optimal leverage, ensuring they are shoulder-width apart.
- Adjust your foot positioning based on the size and shape of the tire.
3. Core Engagement:
- Tighten your core throughout the lift and flip to provide stability.
- A strong core contributes to better control and power transfer.
4. Breathing Technique:
- Inhale deeply before initiating the lift to brace your core.
- Exhale forcefully during the exertion phase, and breathe rhythmically throughout the movement.
5. Grip Strength:
- Develop and maintain a strong grip through specific exercises.
- Consider using chalk or grip-enhancing substances to improve hand traction.
6. Progressive Overload:
- Begin with a manageable tire weight and progressively increase it as your strength improves.
- Focus on explosive power and controlled movements.
7. Repetition and Set Considerations:
- Incorporate tire flips into your routine with a moderate number of repetitions per set.
- Aim for multiple sets to build endurance and explosive strength.
8. Safety Precautions:
- Be cautious of your surroundings to avoid tripping or stumbling during tire flips.
- If the tire is too heavy, consider using a partner for assistance.
9. Visualization:
- Visualize successful tire flips before attempting them, creating a mental connection with the movement.
- Cultivate a positive and confident mindset during each flip.
Incorporating tire flips into your Strongman routine adds a primal and dynamic element to your training. Focus on harnessing your raw power, refining your technique, and progressively challenging yourself with heavier tires. As with any Strongman exercise, if you’re new to tire flips or have any underlying health concerns, consult with a fitness professional or healthcare provider before incorporating them into your training program.
Day 2: Embracing the Odd and Unconventional – Practical Guide (Strongman – Cycle 3 Week 3)
Welcome to Day 2 of Strongman – Cycle 3 Week 3 – a day where the odd and unconventional take center stage. Keg carries, sandbag throws, and Atlas stone lifts await, pushing your limits and expanding your repertoire. Let’s dive into the practical details of mastering these unconventional yet highly effective exercises.
2.1 Keg Carries: Unleashing Functional Strength – Practical Execution and Tips
Keg carries are a hallmark of Strongman training, requiring a unique blend of strength, stability, and functional prowess. Here’s a practical guide on how to execute keg carries effectively, along with tips to maximize your performance:
Proper Execution:
1. Setting Up the Keg:
- Place the keg on a stable surface, ensuring it is filled with an appropriate weight for your current strength level.
- Position the keg with the spout facing either forward or backward, based on your preference.
2. Lifting the Keg:
- Approach the keg with your feet shoulder-width apart.
- Bend at the hips and knees, keeping your back straight.
- Grip the keg handles or around the body of the keg, depending on its design.
3. Lifting Technique:
- Engage your core and lift the keg off the ground by straightening your hips and knees.
- Stand up straight with the keg securely in your grip.
4. Walking Movement:
- Take short, controlled steps.
- Keep your gaze forward, and maintain an upright posture.
- Ensure the keg remains stable in your grip throughout the walk.
5. Turning with the Keg:
- Pivot on one foot to change direction.
- Keep the keg close to your body to minimize instability during turns.
6. Lowering the Keg:
- Approach the designated spot for lowering.
- Bend at the hips and knees to gently lower the keg to the ground.
Tips for Optimal Performance:
1. Foot Placement:
- Keep your feet parallel and directly beneath your hips during the lift and walk.
- Distribute your weight evenly between both feet to maintain balance.
2. Core Engagement:
- Tighten your core throughout the lift and walk.
- A strong core provides stability and minimizes swaying.
3. Breathing Technique:
- Take deep breaths before lifting the keg to stabilize your core.
- Maintain a rhythmic breathing pattern during the walk.
4. Gradual Progression:
- Start with a manageable keg weight, focusing on perfecting your form.
- Gradually increase the load as your strength and stability improve.
5. Focus on Speed and Control:
- Strive for a brisk walking pace while maintaining control.
- Avoid rushing, especially when making turns or navigating obstacles.
6. Practice Turning:
- Incorporate turning drills into your training to enhance agility with the keg.
- Mastering turns is crucial for efficiency and speed.
7. Recovery Between Sets:
- Allow sufficient rest between keg walk sets to maintain optimal strength and form.
- Listen to your body, and adjust rest intervals as needed.
Incorporating keg carries into your Strongman routine adds a dynamic and practical dimension to your training. Focus on the interplay between strength and stability, and progressively challenge yourself to handle heavier kegs. As with any Strongman exercise, if you’re new to keg carries or have any underlying health concerns, consult with a fitness professional or healthcare provider before incorporating them into your training program.
2.2 Sandbag Throws: The Art of Dynamic Strength – Practical Execution and Tips
Sandbag throws epitomize the essence of dynamic strength in Strongman training. Mastering this explosive movement not only challenges your raw power but also enhances your overall athleticism. Here’s a practical guide on how to execute sandbag throws effectively, along with tips to maximize your dynamic strength:
Proper Execution:
1. Setting Up the Sandbag:
- Choose a sandbag with an appropriate weight for your current strength level.
- Position the sandbag on a stable surface, ensuring it is easy to grip.
2. Gripping the Sandbag:
- Stand with your feet shoulder-width apart.
- Bend at the hips and knees, gripping the sandbag from the sides or handles, depending on its design.
3. Squatting Position:
- Lower your body into a squat position, keeping your back straight and chest up.
- Ensure a firm grip on the sandbag with both hands.
4. Explosive Extension:
- Explosively extend your hips and knees, utilizing the power from your lower body.
- Simultaneously, propel the sandbag forward with an overhead throw.

5. Release and Follow Through:
- Release the sandbag at the peak of your throw, aiming for distance or height, depending on your training goals.
- Allow your arms to follow through the motion, maintaining control.
Tips for Optimal Performance:
1. Foot Placement:
- Keep your feet grounded and shoulder-width apart during the throw.
- Ensure a stable base to generate power from the legs.
2. Core Engagement:
- Tighten your core to stabilize your body during the explosive movement.
- A strong core contributes to better control and efficiency in sandbag throws.
3. Breathing Technique:
- Inhale deeply before initiating the throw to brace your core.
- Exhale forcefully as you explode into the movement.
- Breathe in again as you prepare for the next throw.
4. Targeted Landing Zone:
- Designate a landing zone for the sandbag to ensure a safe and controlled descent.
- Practice accuracy and aim to consistently hit your target.
5. Progressive Overload:
- Begin with a manageable sandbag weight and gradually increase it as you become more proficient.
- Focus on perfecting your form before attempting heavier throws.
6. Variations:
- Experiment with different throw variations, such as rotational throws or lateral throws, to target different muscle groups.
- Introduce variety to keep your training dynamic and engaging.
7. Recovery Between Sets:
- Allow sufficient rest between sandbag throw sets to maintain optimal explosive power.
- Adjust rest intervals based on your individual recovery needs.
8. Safety Precautions:
- Ensure the training area is clear of obstacles to avoid tripping or stumbling during the throws.
- Be mindful of your surroundings and the trajectory of the sandbag.
Incorporating sandbag throws into your Strongman routine injects a burst of dynamic strength training. Focus on the explosive nature of the movement, refine your technique, and progressively challenge yourself. As with any Strongman exercise, if you’re new to sandbag throws or have any underlying health concerns, consult with a fitness professional or healthcare provider before incorporating them into your training program.
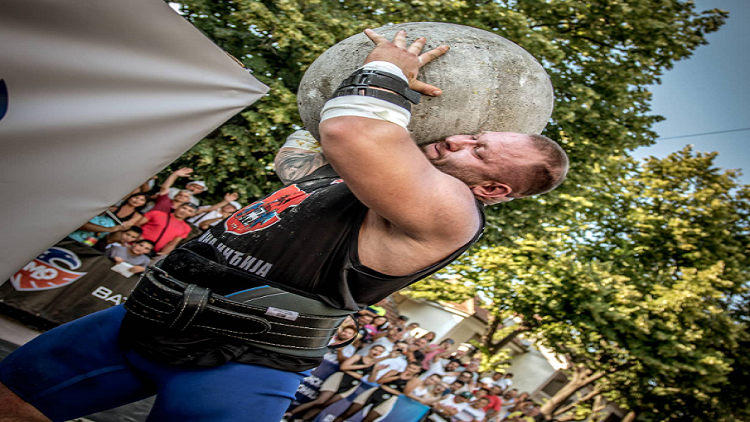
2.3 Atlas Stone Lifts: Strength in Unconventionality – Practical Execution and Tips
Atlas stone lifts are the epitome of Strongman training, requiring a unique blend of strength, technique, and mental fortitude. Mastering this unconventional lift not only builds raw power but also cultivates a deep connection with the ancient roots of strength sports. Here’s a practical guide on how to execute Atlas stone lifts effectively, along with tips to maximize your performance:
Proper Execution:
1. Choosing the Atlas Stone:
- Select an Atlas stone with an appropriate weight for your current strength level.
- Ensure the stone is clean and free from debris that could affect your grip.
2. Foot Placement:
- Stand with your feet shoulder-width apart, toes pointing slightly outward.
- Position the Atlas stone between your feet, centered and close to your shins.
3. Gripping the Stone:
- Squat down and grip the stone with both hands, fingers beneath the stone and palms facing your body.
- Engage your lats to create a stable grip.
4. Lifting Technique:
- Initiate the lift by driving through your legs, engaging your hips, and lifting the stone off the ground.
- Use a smooth and fluid motion, avoiding jerky movements.
5. Hugging the Stone:
- As the stone ascends, bring it close to your body, hugging it with your arms.
- Keep your back straight, chest up, and shoulders back.
6. Loading the Stone:
- Once the stone reaches chest or shoulder height, position it onto a platform, over a bar, or onto another elevated surface.
- Extend your hips and knees to complete the lift and loading phase.
7. Lowering the Stone:
- To lower the stone, reverse the movement by bending at the hips and knees.
- Maintain control as you lower the stone back to the ground.
Tips for Optimal Performance:
1. Stance and Balance:
- Keep a stable and balanced stance throughout the lift.
- Ensure your weight is evenly distributed between both feet.
2. Core Engagement:
- Tighten your core to provide stability during the lift.
- A strong and engaged core contributes to better overall strength and control.
3. Breathing Technique:
- Inhale deeply before initiating the lift to brace your core.
- Exhale during the exertion phase, and breathe rhythmically throughout the movement.
4. Grip Strength:
- Train your grip strength through specific exercises to enhance your ability to handle heavier stones.
- Consider using chalk or tacky (a sticky resin) on your hands for better grip.
5. Progressive Overload:
- Start with a manageable stone weight and progressively increase it as you become more comfortable with the lift.
- Focus on form and technique before attempting maximum loads.
6. Repetition and Set Considerations:
- Aim for a moderate number of repetitions per set, focusing on quality over quantity.
- Perform multiple sets to build both strength and endurance in Atlas stone lifts.
7. Safety Precautions:
- Ensure the training area is clear of obstacles to avoid tripping or stumbling during the lift.
- Use a lifting belt if needed, and be mindful of your lower back throughout the movement.
8. Visualization:
- Visualize successful lifts before attempting them, creating a mental connection with the movement.
- Cultivate a positive and confident mindset during Atlas stone lifts.
Incorporating Atlas stone lifts into your Strongman routine not only builds physical strength but also connects you with the historical roots of strength training. Focus on mastering the technique, gradually increasing the weight, and embracing the challenge of lifting and loading these unconventional stones. As with any Strongman exercise, if you’re new to Atlas stone lifts or have any underlying health concerns, consult with a fitness professional or healthcare provider before incorporating them into your training program.
Day 3: Tactical Precision in Strongman Training – Practical Guide (Strongman – Cycle 3 Week 3)
Day 3 of Strongman – Cycle 3 Week 3 beckons, bringing with it a unique blend of tactical precision and raw power. Log presses and yoke walks demand not only strength but finesse. Let’s delve into the practical aspects of executing these exercises with precision and efficiency.
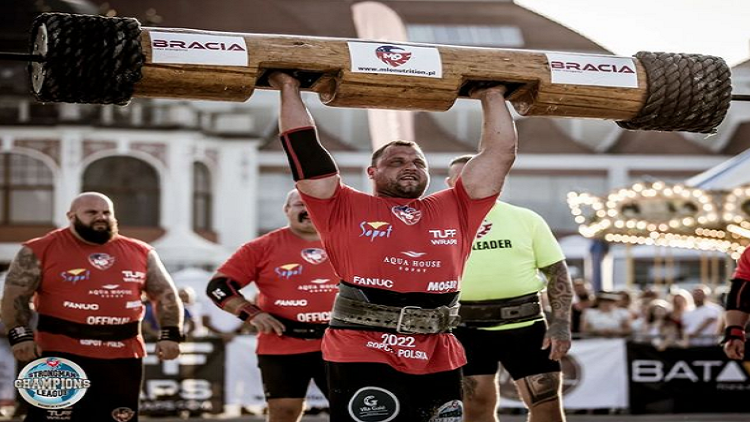
3.1 Log Presses: The Strongman Staple – Proper Execution and Tips
Log presses are a quintessential Strongman exercise that demands not only sheer strength but also a keen understanding of technique. Here’s a detailed guide on how to execute log presses effectively and some tips to enhance your performance:
Proper Execution:
1. Setup:
- Position the log on a stable surface, ensuring it’s at a comfortable height for you to clean to your chest.
- Stand with your feet shoulder-width apart, toes pointing slightly outward.
2. Grip:
- Place your hands on the handles, ensuring they are symmetrical.
- Adjust your grip to a width that allows your forearms to be perpendicular to the ground when viewed from the side.
3. Cleaning the Log:
- Squat down and grip the log.
- Explosively extend your hips, pulling the log up to your chest.
- Catch the log on your upper chest with your elbows pointing forward.
4. Pressing the Log:
- Dip at the knees to create momentum.
- Explosively extend your hips and knees, driving the log overhead.
- Lock out your elbows at the top of the press.
- Lower the log under control to the starting position.
Tips for Optimal Performance:
1. Master the Clean:
- Efficient cleaning is key to a successful log press.
- Practice the clean separately to ensure a smooth transition from the ground to your chest.
2. Engage Your Core:
- A strong core stabilizes your body during the press.
- Tighten your abs before initiating the lift and maintain core engagement throughout.
3. Breathing Technique:
- Inhale deeply before initiating the clean.
- Exhale forcefully as you press the log overhead.
- Breathe in again as you lower the log.
4. Foot Placement:
- Keep your feet planted firmly on the ground throughout the lift.
- Distribute your weight evenly between both feet to maintain balance.
5. Elbow Position:
- Position your elbows slightly forward at the bottom of the press.
- As you press the log, bring your elbows back under the log for a more efficient lift.
6. Practice Progressive Overload:
- Gradually increase the weight of the log as you become more comfortable with the movement.
- Don’t compromise form for heavier weights; prioritize proper execution.
7. Recovery Between Sets:
- Allow adequate rest between sets to maintain optimal strength and power output.
- Listen to your body, and adjust rest intervals as needed.
Incorporating log presses into your Strongman routine adds not just physical strength but also a technical finesse. Consistent practice, attention to detail, and a focus on foundational strength will contribute to mastering this Strongman staple. As with any exercise, if you’re new to log presses or have any underlying health concerns, it’s advisable to consult with a fitness professional or healthcare provider before incorporating them into your training program.
3.2 Yoke Walks: Balancing Speed and Stability – Proper Execution and Tips
Yoke walks are a hallmark of Strongman training, requiring a delicate balance between speed and stability. Mastering this exercise not only enhances your strength but also challenges your ability to control a significant load while in motion. Here’s a detailed guide on how to execute yoke walks effectively and some tips to optimize your performance:
Proper Execution:
1. Yoke Adjustment:
- Set the yoke at an appropriate height, allowing for a comfortable lift without compromising your form.
- Ensure the crossbar is level with your mid-sternum to shoulder height.
2. Lifting the Yoke:
- Approach the yoke with your feet shoulder-width apart.
- Bend at the hips and knees, keeping your back straight.
- Grip the yoke handles or crossbar firmly.
3. Lifting Technique:
- Engage your core and lift the yoke off the ground by straightening your hips and knees.
- Stand up straight with the yoke resting on your upper back and shoulders.
4. Walking Movement:
- Take short, controlled steps.
- Keep your gaze forward, and maintain an upright posture.
- Ensure the yoke remains stable on your shoulders throughout the walk.
5. Turning with the Yoke:
- Pivot on one foot to change direction.
- Keep the yoke close to your body to minimize instability.
6. Lowering the Yoke:
- Approach the designated spot for lowering.
- Bend at the hips and knees to gently lower the yoke to the ground.
Tips for Optimal Performance:
1. Foot Placement:
- Keep your feet parallel and directly beneath your hips during the lift and walk.
- Distribute your weight evenly between both feet to maintain balance.
2. Core Engagement:
- Tighten your core throughout the lift and walk.
- A strong core provides stability and minimizes swaying.
3. Breathing Technique:
- Take deep breaths before lifting the yoke to stabilize your core.
- Maintain a rhythmic breathing pattern during the walk.
4. Gradual Progression:
- Start with a manageable yoke weight, focusing on perfecting your form.
- Gradually increase the load as your strength and stability improve.
5. Focus on Speed and Control:
- Strive for a brisk walking pace while maintaining control.
- Avoid rushing, especially when making turns or navigating obstacles.
6. Practice Turning:
- Incorporate turning drills into your training to enhance agility with the yoke.
- Mastering turns is crucial for efficiency and speed.
7. Recovery Between Sets:
- Allow sufficient rest between yoke walk sets to maintain optimal strength and form.
- Listen to your body, and adjust rest intervals as needed.
Incorporating yoke walks into your Strongman routine adds a dynamic and functional element to your training. Focus on the delicate interplay between speed and stability, and progressively challenge yourself to handle heavier loads. As with any Strongman exercise, if you’re new to yoke walks or have any underlying health concerns, consult with a fitness professional or healthcare provider before incorporating them into your training program.
As you approach Strongman – Cycle 3 Week 3, Day 3, consider the following overarching tips:
3.3 Overarching Tips for Day 3: Log Presses and Yoke Walks
As you approach Day 3 of your Strongman – Cycle 3 Week 3 training, which features log presses and yoke walks, it’s essential to not only focus on the individual exercises but also consider overarching strategies for a successful and productive session. Here are some tips that apply to both log presses and yoke walks:
1. Warm-Up Adequately:
- Dedicate sufficient time to warm up your entire body, emphasizing the muscles involved in log presses and yoke walks.
- Incorporate dynamic stretches, light cardio, and specific warm-up sets with lighter weights.
2. Technical Proficiency:
- Prioritize proper form and technique over lifting heavier weights.
- If you’re new to these exercises, seek guidance from a qualified trainer to ensure correct execution.
3. Breath Control:
- Develop a consistent breathing pattern for both log presses and yoke walks.
- Practice deep inhalation before initiating each lift, exhaling during the exertion, and maintaining rhythmic breathing during walks.
4. Core Engagement:
- Activate your core muscles throughout the entire session.
- A strong and stable core is crucial for maintaining proper posture during log presses and providing support during yoke walks.
5. Progressive Overload:
- Gradually increase the weights in a progressive manner.
- Strive for incremental improvements in strength and endurance rather than drastic jumps in load.
6. Focus on Mobility:
- Include mobility exercises for the shoulders, hips, and ankles in your warm-up.
- Improved mobility enhances your range of motion, contributing to better performance in both log presses and yoke walks.
7. Recovery Between Sets:
- Allow adequate rest between sets to ensure optimal strength and power output.
- Adjust rest intervals based on your individual recovery needs and workout intensity.
8. Mental Preparation:
- Mentally visualize successful lifts and walks before attempting them.
- Cultivate a positive mindset, focusing on the present moment and the mechanics of each movement.
9. Record and Review:
- Use video recordings to review your form.
- Analyze your technique and make adjustments as needed to enhance efficiency and reduce the risk of injury.
10. Adaptability:
- Be prepared to adapt your approach based on how your body responds.
- If something doesn’t feel right, don’t hesitate to make adjustments or seek guidance.
11. Cool Down:
- Dedicate time to a proper cool-down, including static stretching and foam rolling.
- Promote flexibility and aid in muscle recovery to minimize post-workout soreness.
By incorporating these overarching tips into your Day 3 Strongman – Cycle 3 Week 3 training, you set the stage for a productive and injury-resistant session. Remember that consistency, patience, and a holistic approach to your training will contribute to long-term success in the world of Strongman workouts.
Nutritional Considerations for Strongman Training (Strongman – Cycle 3 Week 3)
Fueling your body effectively is crucial when engaging in the demanding and dynamic world of Strongman – Cycle 3 Week 3 training. Proper nutrition not only supports your performance but also aids in recovery and overall well-being. Let’s explore key nutritional considerations for Strongman athletes:
5.1 Protein: The Building Block of Muscle
Protein plays a pivotal role in muscle repair and growth, making it a cornerstone of Strongman – Cycle 3 Week 3 nutrition.

Guidelines:
- Consume a variety of protein sources, including lean meats, poultry, fish, eggs, dairy, and plant-based options.
- Aim for 1.6 to 2.2 grams of protein per kilogram of body weight daily to support muscle protein synthesis.
5.2 Hydration: Optimizing Performance and Recovery
Given the intense nature of Strongman – Cycle 3 Week 3 workouts, staying hydrated is paramount for performance and recovery.
Guidelines:
- Drink water consistently throughout the day, aiming for at least 3 liters for men and 2.2 liters for women.
- Hydrate before, during, and after training to replace fluids lost through sweat.
5.3 Strategic Nutrition for Strongman Athletes
Fueling your body strategically involves considering macronutrient ratios and meal timing to meet the demands of Strongman training.
Guidelines:
Carbohydrates:
- Prioritize complex carbohydrates such as whole grains, fruits, and vegetables to provide sustained energy.
- Adjust carbohydrate intake based on training intensity and volume.
Fats:
- Include healthy fats from sources like avocados, nuts, and olive oil for overall health and hormone production.
Meal Timing:
- Consume a balanced meal 2-3 hours before training to provide sustained energy.
- Have a post-workout meal rich in protein and carbohydrates to support recovery.
Supplementation:
- Consider supplements like creatine, which may enhance strength and power.
- Consult with a nutrition professional to address specific deficiencies or supplement needs.
5.4 Individualization and Periodization
Every athlete is unique, and nutritional needs can vary. Individualize your nutrition plan based on factors such as body composition, training goals, and metabolic rate.
Guidelines:
- Periodize your nutrition to align with training cycles, adjusting calorie and macronutrient intake accordingly.
- Monitor performance and make adjustments to your nutrition plan as needed.
5.5 Recovery Protocols:
Optimizing recovery is an integral part of Strongman training, and nutrition plays a crucial role in this process.
Guidelines:
- Prioritize post-workout nutrition to replenish glycogen stores and support muscle repair.
- Include anti-inflammatory foods such as berries, fatty fish, and leafy greens to aid recovery.
Remember, these nutritional considerations serve as general guidelines. Individual needs may vary, and consulting with a registered dietitian or nutrition professional can provide personalized recommendations based on your specific requirements and goals. By fueling your body strategically, you empower yourself to tackle the challenges of Strongman – Cycle 3 Week 3 training with vitality and resilience.
Recovery Protocols for Strongman Training (Strongman – Cycle 3 Week 3)
In the demanding world of Strongman training, recovery is not just a luxury; it’s a necessity. Proper recovery protocols are the unsung heroes that ensure your body is ready to tackle the next set of challenges. Let’s explore a comprehensive approach to recovery for Strongman – Cycle 3 Week 3 athletes:

6.1 The Role of Sleep in Recovery
Quality sleep is a cornerstone of effective recovery. During sleep, the body undergoes crucial processes such as muscle repair, hormone regulation, and memory consolidation.
Guidelines:
- Aim for 7-9 hours of sleep per night to optimize recovery.
- Establish a consistent sleep schedule, prioritizing both bedtime and wake time.
- Create a conducive sleep environment by keeping the room dark, cool, and quiet.
6.2 Nutrition’s Impact on Recovery
Nutrition plays a pivotal role in replenishing energy stores, supporting muscle repair, and reducing inflammation after intense Strongman workouts.
Guidelines:
- Consume a post-workout meal rich in carbohydrates and protein to replenish glycogen stores and support muscle recovery.
- Include antioxidant-rich foods, such as berries and leafy greens, to combat inflammation.
- Stay adequately hydrated to facilitate nutrient transport and aid in overall recovery.
6.3 Active Recovery Techniques
Incorporating active recovery techniques helps alleviate muscle soreness, enhance flexibility, and promote circulation.
Guidelines:
Foam Rolling:
- Target muscle groups with a foam roller to release tension and improve flexibility.
- Focus on areas prone to tightness, such as the back, hips, and legs.
Dynamic Stretching:
- Engage in dynamic stretches to improve range of motion and promote blood flow.
- Include movements that mimic the exercises performed during Strongman training.
Low-Intensity Cardio:
- Incorporate low-impact cardio activities like walking or cycling to enhance blood circulation without causing additional stress to muscles.
6.4 Listening to Your Body
One of the most crucial aspects of recovery is paying attention to your body’s signals. Rest and adjust your training intensity based on how your body responds.
Guidelines:
- Implement rest days or active recovery days into your training program.
- Be mindful of signs of overtraining, such as persistent fatigue, decreased performance, and mood changes.
6.5 Mental Recovery
Recovery isn’t just physical—it’s mental as well. Strongman training can be mentally taxing, and addressing mental fatigue is essential for long-term success.
Guidelines:
- Incorporate relaxation techniques such as deep breathing or meditation to reduce stress.
- Ensure a healthy work-life balance to prevent burnout.
6.6 Professional Support
Seeking professional support can provide personalized insights and guidance for optimal recovery.
Guidelines:
- Consult with a physical therapist or sports massage therapist for targeted muscle recovery.
- Consider periodic check-ins with a sports psychologist for mental well-being.
By embracing a holistic approach to recovery, encompassing sleep, nutrition, active recovery, mental well-being, and professional support, you empower yourself to face the challenges of Strongman training with resilience and longevity. Remember, recovery isn’t a sign of weakness; it’s a strategic move towards sustained strength and performance.
Overview
In the crucible of Strongman training, where unconventional meets unparalleled, Cycle 3, Week 3, Days 1, 2, and 3 stand as a testament to the fusion of power, precision, and adaptability. As you embark on this journey, remember that each lift, carry, and throw contributes to a symphony of strength that defines the essence of Strongman workouts. Embrace the challenge, fuel your body wisely, prioritize recovery, and let the echoes of your strength reverberate through the annals of Strongman history.
References:
1. Swinton, P. A., Lloyd, R., Keogh, J. W., Agouris, I., & Stewart, A. D. (2012). A biomechanical analysis of straight and hexagonal barbell deadlifts using submaximal loads. Journal of Strength and Conditioning Research, 26(7), 1897-1904.
2. Winwood, P. W., Keogh, J. W., Harris, N. K., & Jones, D. A. (2011). The strength and conditioning practices of strongman competitors. The Journal of Strength & Conditioning Research, 25(11), 3118-3128.
3. Simenz, C. J., Dugan, C. A., & Ebben, W. P. (2005). Strength and conditioning practices of National Football League strength and conditioning coaches. Journal of Strength and Conditioning Research, 19(3), 495-504.
4. Comfort, P., & Pearson, S. J. (2011). A comparison of maximal squat strength and 5-, 10-, and 20-meter sprint times, in athletes and recreationally trained men. The Journal of Strength & Conditioning Research, 25(9), 2598-2604.
5. Drinkwater, E. J., Galna, B., McKenna, M. J., Hunt, P. H., & Pyne, D. B. (2007). Validation of an optical encoder during free weight resistance movements and analysis of bench press sticking point power during fatigue. Journal of Strength and Conditioning Research, 21(2), 510-517.
6. Winwood, P. W., Cronin, J. B., Brown, S. R., & Keogh, J. W. (2014). A biomechanical analysis of the Farmers Walk, and comparison with the Deadlift and unloaded walk. International Journal of Sports Science & Coaching, 9(3), 559-577.
7. Winwood, P. W., Keogh, J. W., Harris, N. K., & Dudson, M. K. (2011). The strength and conditioning practices of strongman competitors. The Journal of Strength & Conditioning Research, 25(11), 3118-3128.
8. Comfort, P., & Kasim, P. (2007). Optimizing Squat Technique. Strength & Conditioning Journal, 29(6), 10-13.
9. Featured image @Unsplash, freepik, pexels, instagram (com)
10. Featured stream @Youtube, freepik, pexels, instagram (com)


