
After a workout, you might feel tempted to collapse, head straight for a shower, or enjoy a protein shake. But before any of that, it’s crucial to prioritize your cool-down. Sadly, many fitness enthusiasts either skip this vital step or give it minimal attention. Cool down exercises play a critical role in muscle recovery, joint flexibility, and reducing post-workout soreness.
With over 15 years of experience as a personal trainer, I consistently emphasize the importance of a proper cool-down routine. It not only aids in recovery and progress post-workout but also enhances performance in future sessions.
In this article, I delve into the reasons behind cooling down, explain how to do it effectively, and subsequently share some of the top cool-down exercises to help you maximize your fitness gains.
Table of Contents:
How to Cool Down
- 17 Dynamic and Static Stretches (10-15 minutes)
- 10 Static Stretches
Cool Down Exercise Bonus — Foam Rolling
Tailoring Your Cool Down to Specific Lifting Workouts
What is Fascia?
Why Cool Down, Anyway?
Overview
References
How to Cool Down
While a thorough warm-up typically involves several phases, a cool-down simplifies to just two: lowering your pulse through cardio and engaging in stretching and mobility exercises. Therefore, your cool-down should ideally span from five to 15 minutes.
The duration of your cool-down session hinges on the intensity of your workout. More strenuous activities necessitate a longer cool-down period. Additionally, if your workout engaged multiple muscle groups extensively, a slightly longer cool-down is advisable to restore them to their pre-exercise condition.
So, how long should a cool-down be? The straightforward answer is: long enough to effectively achieve its purpose!
3 Cardiovascular Cool Down Exercises (5-10 minutes)
During resistance training, the body diverts blood to the working muscles, a phenomenon known as blood pooling. Additionally, lactic acid and other waste products accumulate in these areas, contributing to muscle soreness.
Engaging in low-intensity steady state (LISS) cardio post-workout helps pump freshly oxygenated blood throughout your body. This process eliminates blood pooling, reoxygenates your muscles, and flushes out metabolic waste products. It also gradually lowers your heart and breathing rate.

The most efficient cool-down cardio exercises include:
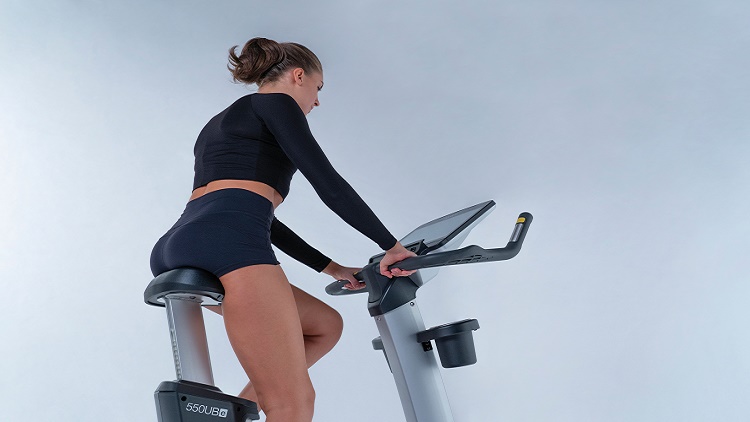
Walking: A brisk pace around the gym or outdoors.
Slow Cycling: If your gym has stationary bikes, hop on and pedal at an easy pace.
Rowing: Maintain a relaxed pace on the rowing machine.
Begin at a moderate intensity, then gradually decrease speed and effort over several minutes. Aim for your heart and breathing rate to approach their pre-exercise levels.
For most people, three to five minutes should suffice.
By the end of this phase, your heart and breathing rate should be close to normal, and your muscles may feel reenergized from the influx of oxygenated blood. However, be careful not to turn this into a high-intensity interval training (HIIT) session, which would defeat its purpose.
17 Dynamic and Static Stretches (10-15 minutes)
Once your heart and breathing rate return to normal, it’s time to stretch and mobilize the muscles and joints you’ve just worked. This phase aims to prevent adaptive shortening of the muscles, improve muscle elasticity, promote good posture, and reduce muscle soreness.
Flexibility and mobility are related and interdependent but also slightly different. It refers to the elasticity and extensibility of your muscles, while mobility is the freedom of movement at your joints.
Flexibility involves stretching and holding your muscles in a lengthened position, while mobility involves moving your joints through a wide range of motion. Your post-exercise routine should include both dynamic and static stretches to optimize recovery.
10 Static Stretches
The best type of stretches for the cool down are static stretches. These involve easing into a stretch and then holding it for a set duration. If you have good flexibility, holding a stretch for 20-30 seconds can help maintain your current muscle elasticity.
However, if your muscles are tight, you should hold your stretch for longer, typically 60 seconds or more.
Customize your cool-down stretches based on your flexibility needs and the specific workout you’ve just completed. Focus more on the muscles that need extra attention. Choose stretches that target the muscles you worked during your session.
Examples include:
- Hamstring Stretch: While standing, reach for your toes with a straight back.
- Quad Stretch: Standing, grab your foot and gently pull it towards your glutes.
- Calf Stretch: Lean against a wall with one leg extended behind you, heel on the ground.
- Chest Opener: Clasp your hands behind your back and lift your chest.
- Triceps Stretch: Reach one arm overhead and bend your elbow, touching your upper back.
- Supine Hamstring Stretch with Strap: Loop a strap around one foot and gently pull your leg towards your chest while keeping the other leg extended on the ground.
- Doorway Chest Stretch: Stand in a doorway, place your forearms on the doorframe with your elbows bent at 90 degrees, and lean forward.
- Dead-Hang Full-Body Stretch: Hang from a pull-up bar or sturdy overhead structure with your arms fully extended.
- Seated Adductor Stretch: Sit on the ground with your legs spread wide, lean forward from your hips while keeping your back straight, and reach toward your toes.
- Kneeling Forearm Stretch: Kneel on the ground, place your forearms on the ground with your fingers pointing towards your knees, and sit back on your heels.
These stretches will help you cool down effectively, ensuring that your muscles and joints recover properly and are well-prepared for your next workout. By incorporating these stretches into your routine, you’ll promote better recovery, reduce muscle soreness, and enhance your overall flexibility and performance for future training sessions.
7 Dynamic Stretches
After statically stretching the muscles that need it most, you should then move on to mobilizing your primary joints, namely your ankles, knees, hips, lower back, and shoulders.
Mobility exercises involve putting the target joint through an extensive but relaxed range of motion. This increases synovial fluid production, which is the body’s natural lubricating and nourishing oil, enhancing joint function and reducing stiffness.
Focus on the major muscle groups you just trained.
Here are a few detailed examples:
Arm Circles:
Stand with your feet shoulder-width apart and extend your arms out to the sides. Slowly make small circles with your arms, gradually increasing the size of the circles. Perform 10-15 circles forward, then switch direction and do 10-15 circles backward. This helps increase shoulder mobility and warms up the rotator cuff muscles.
Leg Swings:
Hold onto a stable surface for balance. Swing one leg forward and backward in a controlled, fluid motion. Keep your core engaged and avoid jerky movements. Do 10-15 swings per leg. Then, swing your leg side to side, crossing it in front of your body and then out to the side. Perform 10-15 swings per leg. This exercise loosens up the hip flexors, hamstrings, and adductors.
Torso Twists:
To start, stand with your feet hip-width apart and your arms extended out in front of you. Then, gently rotate your torso to the right, allowing your left heel to come off the ground. Afterward, return to the center and twist to the left. Perform 10-15 twists on each side. Ensure your movements are slow and controlled to avoid straining your back. This exercise effectively engages your core and improves spinal mobility.
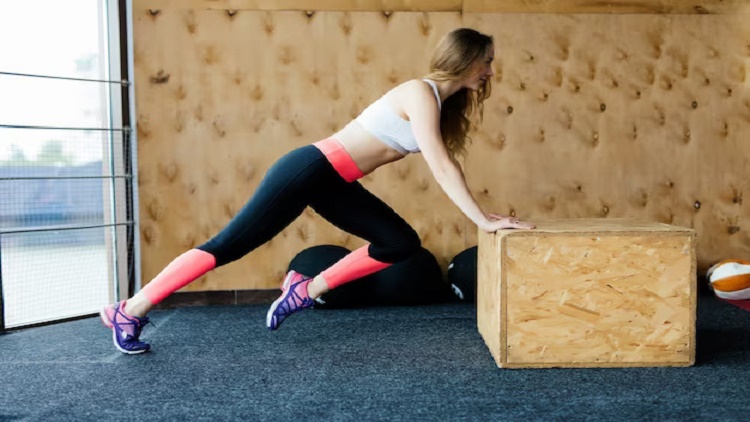
Walking Lunges:
Take a step forward with your right leg and lower your body until your right thigh is parallel to the ground and your left knee nearly touches the floor. Push off with your left foot and step forward into the next lunge with your left leg. Continue alternating legs for 10-12 steps per leg. This exercise targets the quadriceps, glutes, and hamstrings, while also increasing hip flexibility.
Shoulder Rolls — Cool Down Exercises:
Stand with your feet hip-width apart and your arms relaxed by your sides. Slowly roll your shoulders forward in a circular motion for 10-15 repetitions, then reverse the direction and roll your shoulders backward for another 10-15 repetitions. This exercise helps release tension in the upper body and improves shoulder mobility.
Cossack Squat:
Stand with your feet wider than shoulder-width apart. Shift your weight to your right leg, bending your right knee and lowering your hips into a squat while keeping your left leg straight and foot flat on the ground. Push through your right heel to return to the starting position and repeat on the other side. Perform 8-10 repetitions per side. This exercise enhances hip mobility and strengthens the inner thigh muscles.
Squat and Hip Pry:
Assume a deep squat position with your feet shoulder-width apart and toes pointing slightly outward. Place your elbows against the inside of your knees and press your palms together in a prayer position. Gently push your knees outward with your elbows while keeping your chest lifted and back straight. Hold this position for 20-30 seconds, focusing on opening up your hips and groin. This stretch improves hip flexibility and mobility.
Incorporating these mobility exercises into your cool-down routine will not only help maintain and improve joint health but will also ensure you’re ready for your next workout with enhanced flexibility and a reduced risk of injury. By regularly practicing these movements, you’ll support long-term joint function and overall physical well-being, making each subsequent training session more effective and safer.
Cool Down Exercises Bonus — Foam Rolling
Foam rolling is a form of deep-tissue massage, also known as self-myofascial release. Instead of having someone press down on your body, you lie on the roller and use your body weight to apply pressure to your muscles. By rolling up and down, you simulate massage-like movements. With a bit of creativity and flexibility, you can use a foam roller on virtually every part of your body.
Like all types of massage, foam rolling helps increase blood flow and relax muscles, making it an excellent way to treat and prevent a wide range of aches and pains. However, what sets foam rolling apart from regular massage is its effect on the fascia surrounding your muscles.
The fascia is a connective tissue that encases your muscles, providing support and structure. Over time, due to various factors such as inactivity, repetitive movements, or injury, the fascia can become tight and develop adhesions or knots. This can lead to restricted movement, muscle imbalances, and discomfort.
Foam rolling helps break up these adhesions and restore the fascia’s normal function. By applying pressure to specific areas, you can release tension, improve flexibility, and enhance your overall range of motion. Additionally, foam rolling can aid in muscle recovery by promoting the removal of metabolic waste products and reducing muscle soreness.
Here are some key benefits of foam rolling:
- Increased Blood Flow: Foam rolling helps improve circulation, delivering more oxygen and nutrients to your muscles.
- Muscle Relaxation: The pressure applied during foam rolling helps relax tight muscles and relieve tension.
- Enhanced Flexibility: Regular foam rolling can improve your flexibility by lengthening the fascia and muscles.
- Pain Relief: Foam rolling can alleviate muscle soreness and reduce the risk of developing chronic pain conditions.
- Improved Range of Motion: By releasing adhesions in the fascia, foam rolling can enhance your joint mobility and overall movement quality.
To get the most out of foam rolling, it’s important to use proper technique and target the right muscle groups. Spend at least 1-2 minutes on each muscle group, focusing on areas that feel particularly tight or tender. Roll slowly and apply enough pressure to feel the benefits without causing excessive pain.
Incorporating foam rolling into your regular fitness routine can help you maintain optimal muscle function, prevent injuries, and enhance your overall performance. Whether you’re an athlete or someone looking to improve their general well-being, foam rolling is a valuable tool for promoting muscle health and recovery.
Tailoring Your Cool Down to Specific Lifting Exercises
Here’s a guide on how to customize your cool-down routine based on your specific resistance training sessions:
Leg Day
Emphasize: Hamstring, quad, and glute stretches.
- Hamstring Stretch: While standing, reach for your toes with a straight back.
- Quad Stretch: Standing, grab your foot and gently pull it towards your glutes.
- Glute Stretch: Sit on the ground, cross one leg over the other, and gently pull the knee towards your chest.
Back and Biceps
Focus on: Lat, shoulder, and bicep stretches.
- Lat Stretch: Extend your arm overhead and lean to the opposite side, stretching the side of your torso.
- Shoulder Stretch: Cross one arm over your chest and use the other arm to gently pull it closer.
- Bicep Stretch: Stand facing a wall, extend your arm and place your palm on the wall, then slowly rotate your body away from the wall.
Chest and Triceps
Prioritize: Chest opener, triceps, and shoulder stretches.
- Chest Opener: Clasp your hands behind your back and lift your chest.
- Triceps Stretch: Reach one arm overhead and bend your elbow, touching your upper back.
- Shoulder Stretch: Cross one arm over your chest and use the other arm to gently pull it closer.
Shoulder Day — Cool Down Exercises
Include: Additional rotator cuff stretches and mobility exercises.
- Rotator Cuff Stretch: Use a resistance band to gently pull your arm across your body.
- Shoulder Circles: Perform forward and backward arm circles, gradually increasing the size of the circles.
- Internal and External Rotations: Use a light resistance band to perform internal and external shoulder rotations.
By customizing your cool-down routine to target the muscles worked during your training session, you can help promote flexibility, reduce muscle soreness, and enhance recovery. Incorporate these specific stretches and mobility exercises to ensure you’re addressing the needs of the muscles you’ve just trained.
What is Fascia?
Fascia is a fibrous sheath that envelops all muscles, thereby providing structure, separation, and support within the muscular system. Consequently, it plays a crucial role in maintaining the shape and function of muscles. Furthermore, this connective tissue ensures that each muscle operates efficiently by keeping them distinct and properly aligned. As a result, the fascia contributes significantly to the overall integrity and performance of the muscular system.
However, fascia can sometimes adhere to the muscles it surrounds, a condition often described as becoming “gummed up.” This adhesion can limit the range of motion and cause pain, often felt as hotspots or pressure points—localized areas of tenderness.
Ignoring these hotspots can lead to reduced flexibility and an increased risk of injury. This is where foam rolling, also known as self-myofascial release, comes into play. By rolling over the muscles, you help free up the fascia, eliminating adhesions and reducing pain.
Freeing up your fascia is a straightforward, albeit initially uncomfortable, process. Start with light pressure and gradually increase your weight on the roller over several sessions. It might take a few weeks to work up to putting your full weight on the roller, but even light foam rolling can offer significant benefits.
Foam Rolling Routine — Cool Down Exercises
Here’s a basic foam rolling routine to incorporate after training as part of your cool-down. It can also be performed on rest days or anytime your muscles feel like they need a massage.
1. Calves:
Begin by sitting with your legs extended, then position the foam roller under your calves. Lift your body slightly off the ground and proceed to roll smoothly from your ankles to just below your knees.
2. Hamstrings:
Position yourself comfortably with the foam roller under your thighs. Elevate your body slightly, then proceed to roll smoothly from just above your knees to below your glutes.
3. Quads:
Begin by lying face down with the foam roller positioned under your thighs. Gradually roll from just above your knees up to your hips.
4. Glutes:
Sit on the foam roller and cross one leg over the other. Then, lean towards the side of the crossed leg and roll from the top of your glutes to the bottom.
5. Lower Back — Cool Down Exercises:
– Lie on your back with the foam roller under your lower back.
– Roll from the base of your spine to your mid-back.
6. Upper Back:
– Lie on your back with the foam roller under your upper back.
– Roll from your mid-back to your shoulders.
7. IT Band:
– First, lie on your side with the foam roller positioned under your outer thigh.
– Next, roll slowly from just below your hip to just above your knee.
8. Lats:
– Lie on your side with the foam roller under your armpit.
– Roll from your armpit down to your mid-torso.
9. Chest:
– Lie face down with the foam roller under your chest.
– Roll from your shoulder to the center of your chest.

Foam rolling, when done consistently, can help maintain healthy fascia, improve flexibility, reduce muscle soreness, and enhance overall performance. Start light, be patient, and gradually increase the intensity to reap the full benefits of this practice.
Why Cool Down, Anyway?
A cool-down serves as the counterpart to a warm-up. While warm-ups prepare your body for exercise, cool-downs help it return to its pre-workout state, known as homeostasis. This process involves lowering heart and breathing rates, easing muscle tension, mobilizing joints, restoring muscles to their resting length, and clearing metabolic waste from tissues.
While scientific evidence on the direct benefits of cooling down is limited, anecdotal evidence suggests it may accelerate recovery and reduce stiffness and soreness post-exercise. The effectiveness of cooling down can vary among individuals, so it’s worth trying for at least a month to gauge its impact on your personal recovery.
If you find that cooling down helps you recover faster and feel less discomfort after workouts, it may be beneficial to incorporate it regularly. Conversely, if you notice no significant difference, you can opt to skip the cool-down without missing out on essential benefits.
Overview — Cool Down Exercises
Wrapping up your workout with a proper cool-down can significantly enhance recovery and minimize muscle soreness. Spending just a few extra minutes on this step can make a noticeable difference, allowing you to get back to your fitness routine sooner.
The key to an efficient cool-down is to tailor it to the muscles you’ve just worked. For instance, after an upper-body session, focus primarily on cooling down those specific muscles rather than the entire body. This targeted approach can make your cool-down sessions both effective and time-efficient, typically requiring only five to 15 minutes.
By implementing the methods and exercises outlined in this article, you can optimize your cool-down routine and support your body’s recovery process. Your efforts will pay off in improved performance and overall well-being.
References;
- PubMed: Do We Need a Cool-Down After Exercise? A Narrative Review of the Psychophysiological Effects and the Effects on Performance, Injuries, and the Long-Term Adaptive Response https://www.ncbi.nlm.nih.gov
- Featured image @Unsplash, freepik, pexels (com)
- Featured stream @Unsplash, youtube, pexels (com)


